Il mio Dragster Autocostruito
- 29 Apr 2004
L'amico Nitro ci invia dall'Olanda, un articolo sulla costruzione del suo Dragster, da non perdere... A) La Base
Partendo da una vecchia SG degli anni 80 incompleta, l'ho convertita in un Dragster. Ho comprato la SG insieme ad altri vecchi modelli e ricambi in un' asta su Internet in Olanda. Il modello non era completo, ma la piastra radio, il
 telaio, l'avantreno, il retrotreno e il motore erano in buone condizioni anche se sporchi e trasandati.
Ho iniziato pulendo il modello e raccogliendo tutte le parti che mi servivano. Visto che avevo comperato molti ricambi, se escludiamo la
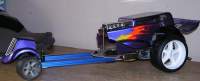
carrozzeria e le ruote posteriori, tutto il resto il resto lo avevo praticamente in casa. Per allungare il telaio, ho usato dei profili in alluminio chiamati Lubic prodotti dalla AeroCool in Taiwan(www.aerocool.com.tw) Questi profili sono molto resistenti e normalmente sono usati per costruire i Case dei computer.Sono poi andato al negozio di modellismo dove ho comprato due gomme della FG scala 1/5 e i relativi trascinatori. Ho preso anche una carrozzeria Carson Hot Rod body (art.no. 65228). Ho verniciato la scocca con il rosso metallizzato Tamiya (no. PS-18) e con delle mascherature create da me ho dipinto le fiammate sui lati.
B) Montaggio....
Dopo aver modificato i trascinatori per inserirli sull'asse posteriore e montato le gomme, dovevo trovare il giusto rapporto corona pignone e tutt' ora sto' lavorando e facendo dei test in merito. Montate le gomme FG al posteriore, allungato il telaio con i profili in alluminio, verniciata la scocca Carson Hot Rod e molte altre piccole modifiche per adattare il tutto e finire il lavoro, è giunto il momento di fare le prime fotografie e il primo test. Spero di trovare il giusto rapporto questo weekend e riprendere il modello in azione.
C) Il frontale
Nello spazio vuoto tra l'avantreno originale e le ruote anteriori, monterò un JAGGAS Nitrous Oxide kit, un piccolo kit, venduto da www.jaggas.com che migliora le prestazione del motore. Dopo aver montato il NoS kit, coprirò tutta la parte frontale con una fine rete metallizzata.
Potete vedere molte altre immagini sul forum del mio sito www.RC-Junkies.com al seguente indirizzo: http://www.bb-hardware.com/modules/newbb_plus/viewtopic.php?topic_id=326&forum=3
My homebuild Dragster
A) The basis
On the base of an older incomplete SG from the 80's I've rebuild it to a Dragster. I bought the SG togehter with some other older cars and parts on a Ebay like website in the Netherlands. The car was not complete, but radioplate, chassis, front end, rear axle and the engine were in good shape, although old and dirty.
I started cleaning and collecting the parts needed. As I bought a lot of stuff, all the parts needed except the body and rear wheels I had in my possession. For the lengting of the chassis I've used 'Lubic' which are aluminium profiles made by AeroCool in Taiwan (www.aerocool.com.tw) These profiles are very stiff and normally used to build computer cases.
Next I went to the hobby store and bought two FG 1:5 wheels and wheelcarriers for these wheels. Also I bought a Carson Hot Rod body (art.no. 65228).I spray painted the body Tamiya metallic Purple (no. PS-18) and with some homemade masking film I made the flame on the side.
B) Building....
After adjusting the wheelcarriers in order to fit the rear axle and mounting the wheels on them, I had to figure out a suitable gearratio. (still working/testing on that)I've mounted FG wheels on the rear, lengtened the chassis with some aluminium profiles, painted the Carson Hot Rod body and did a whole lot of other small alterations to have everything fitted and working. Then it was time to make some pictures, and make the first test runs.I hope to finish testing the gear ratio this weekend and then I'll shoot some action pictures.Â
C) The front end
In the empty spot behind the front wheels and the body will mounted a JAGGAS Nitrous Oxide kit. This is a small kit, which is sold by www.jaggas.com and which can boost the performance. After mounting the NoS kit I will cover the front end with a fine metal mesh.
You can find a lot more picture in the forum of www.RC-Junkies.com at the following link:http://www.bb-hardware.com/modules/newbb_plus/viewtopic.php?topic_id=326&forum=3
 |
 |
 |
 |
 |
 |
 |
 |
 |
 |